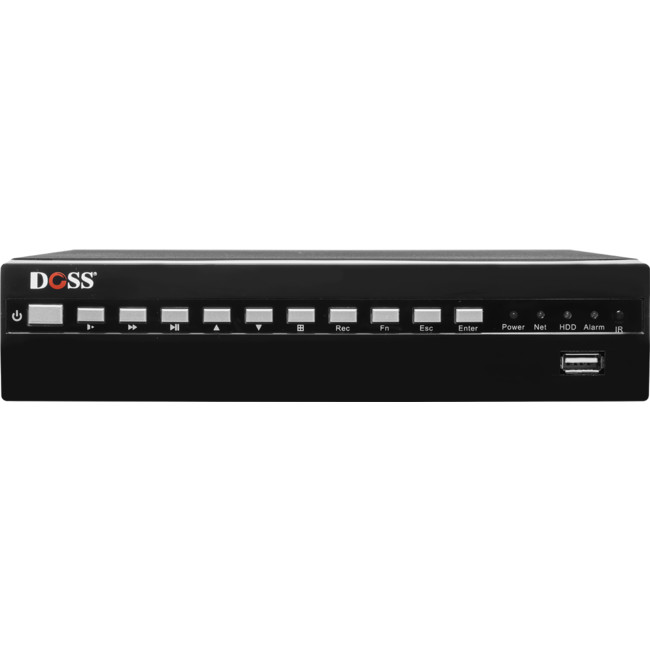
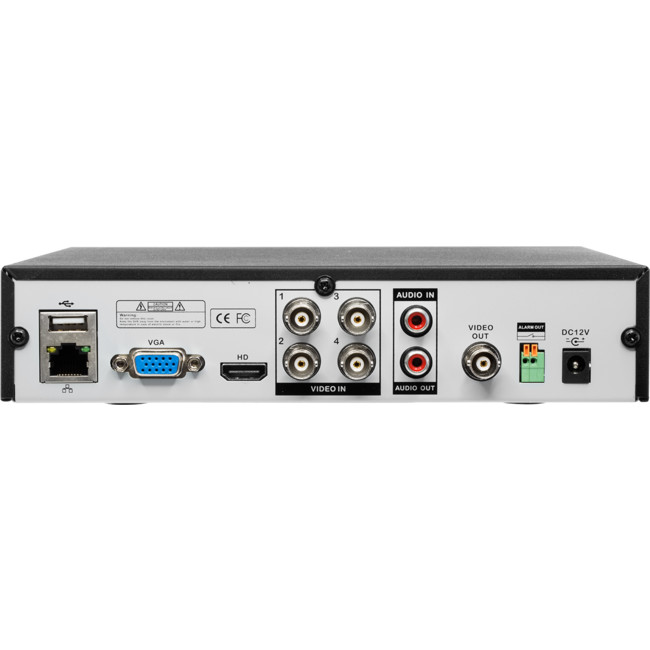
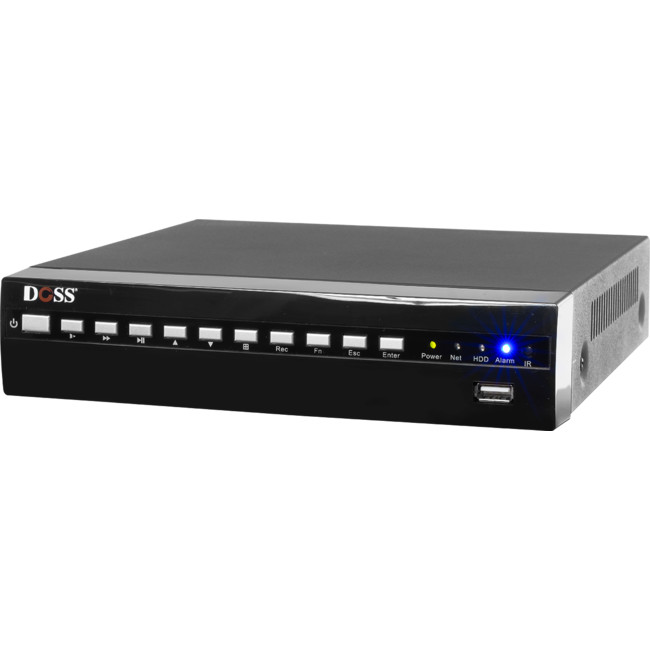
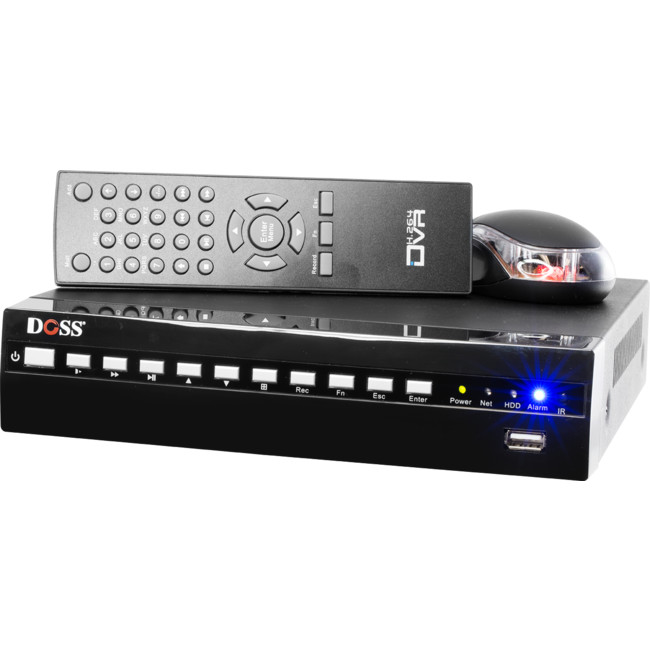
4DVR960ECO 4CH 960H ECONOMICAL NETWORK DVR
New interface, slimmer design, lighter—silent operation—faster boot-up
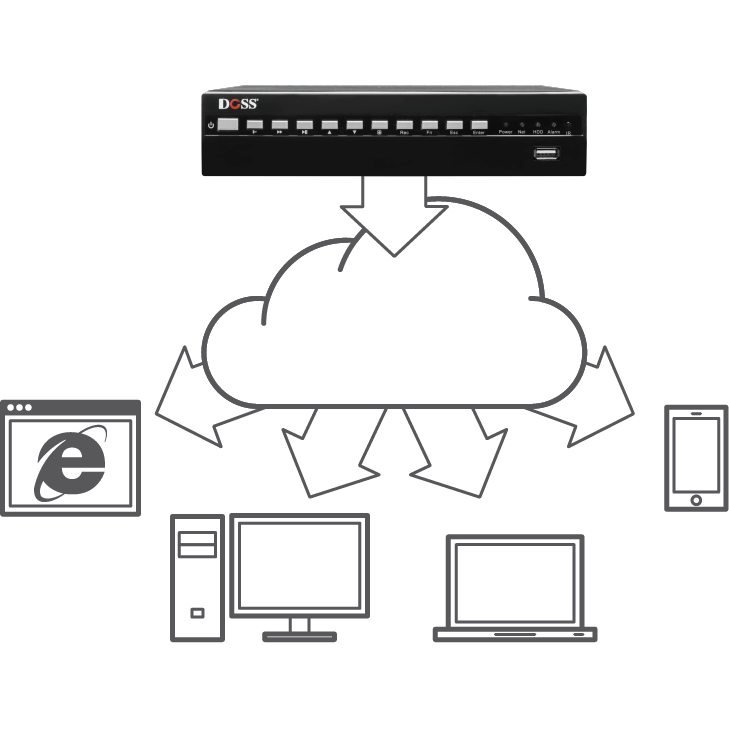
P2P Technology—no more configuring port forwarding! See how here…
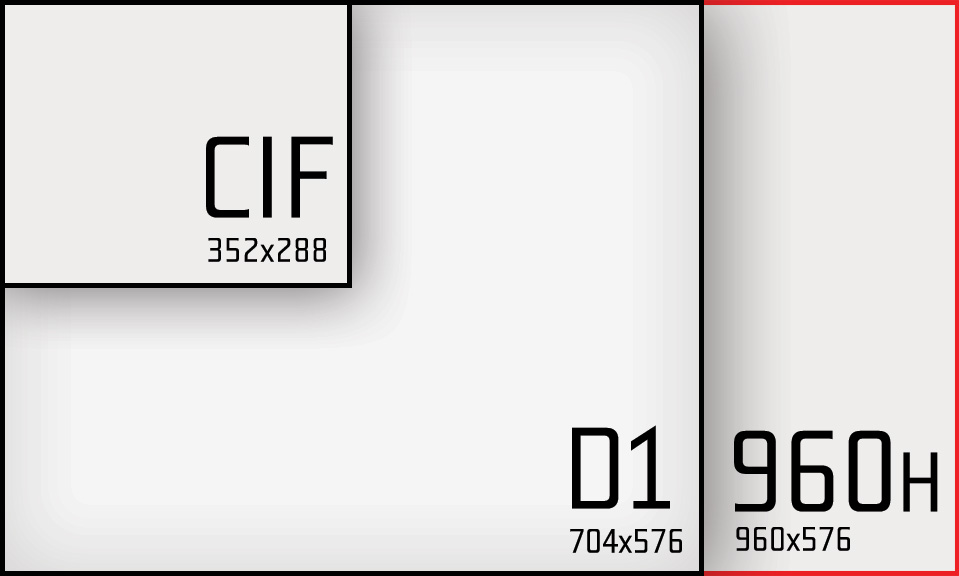
960H high resolution recording
Latest P2P technology allows viewing from anywhere in the world without configuring complicated Port Forwarding or expensive Dynamic DNS services! Simple QR Code allows instant access from mobile phones using the free app available for iOS and Android.
Get the maximum quality image out of your 700 TVL resolution cameras—the latest 960H DVR recording technology allows the clearest possible images for analogue video!
- 4CH 960H real time recording
- H.264 Compression (up to 8000kbps)
- 960H / D1 / CIF and QCIF resolutions
- New interface, slimmer design, lighter
- No fan for silent operation
- Faster boot-up
- Embedded Linux operating system
- Supports Live video playback while recording
- 1x Internal SATA connections for HDD
- Up to 4TB internal storage
- Network functionality: DDNS, Email, UPnP, NTP, P2P
- Remote viewing via Web browser, PC Client, and Mobile Apps
- BNC/VGA/HDMI simultaneous output
- up to 1080P output via HDMI for high resolution grid view
- External alarms for interfacing with existing security systems
Specifications
| 4DVR960ECO | |
|---|---|
| VIDEO | |
| Video Format | PAL / NTSC |
| Video compression | H.264 (High Profile @ Level 4.2) |
| Recording Resolution | 960H, D1, CIF, QCIF |
| Video Output | CVBS / VGA / HDMI simultaneous output 1920×1080, 1440×900, 1280×1024, 1366×768, 1024×768, 800×600 |
| Bit Rate | 64-8000kbps |
| Image Display | 1 / 4 |
| Snapshot | Yes (BMP) |
| Motion Detection | 396 zones (22×18) surveyed area can be set in every screen and multi sensitivity adjustable |
| AUDIO | |
| Audio Compression | G.711A |
| Audio Input | 4CH |
| Audio Output | 1CH, BNC port |
| Talkback | Bidirected-talk, BNC port |
| VIDEO RECORDING AND PLAYBACK | |
| Video Frame Rate | PAL: 1-25fps NTSC: 1-30fps |
| Record Mode | Manual / Alarm / MD / Regular |
| Playback | 4CH 960H simultaneous realtime playback |
| Search Method | Time, Calendar, Event, Channel |
| Video Playback | Start, Stop, Fast play, Slow play, Frame play, Snapshot, Full screen, Roller amplification time ball precise playback |
| STORAGE AND BACKUP | |
| Interface | 1x SATA |
| HDD Capacity | Max. 4TB (Single HDD) |
| Storage | Local HDD, Network |
| Backup Method | Network, USB storage device, USB recorder |
| NETWORK MANAGEMENT | |
| Protocol | TCP/IP, HTTP, DDNS, SMTP (SSL), DHCP, PPPoE, UPNP, NTP, P2P |
| EXT INTERFACE | |
| Video Input | 4CH BNC (1.0Vp-p, 75Ω) |
| Network Interface | RJ45 10M / 100M adaptive Ethernet port |
| Alarm Input | [none] |
| Alarm Output | x1 |
| RS-485 | 1 RS485 port |
| USB Port | 2x USB2.0, support Wi-Fi/3G Dongles |
| GENERAL | |
| Operating Temperature / Humidity | -10°C ~ 55°C / 10% ~ 90% |
| Power Supply | DC12V / 5A |
| Power Consumption | TBD |
| Dimensions (LxWxH) | 215 x 210 x 45mm |
| Weight | About 2 kg |
| 4DVR960ECO | |
Package contents
- DVR unit
- USB mouse
- Remote control
- 1x SATA cable for HDD connection
- 1x Power cable for HDD
- Screw kits for hard drive
- Power supply
- Software CD
Downloads
Links
- Online remote access login: GooLink.org
- GooLink App: Google Play / Apple App Store
FAQs
- I’ve just hooked up my DVR and I can’t access it—I’ve tried the default password “123456” but it won’t let me continue.
- The 960H DVRs come out of the box with no password. You can simply press enter when asked for a password. Remember to set one up later from the menu!
- My remote doesn’t seem to be working but works with another remote—yes, I’ve even tried fresh batteries.
- To enable you to use one remote for multiple DVRs, the remote and DVRs have an ID function. If you have not setup IDs on your DVR you’ve probably accidentally changed the remote’s ID. To change it back to the default, press [ADD] followed by [0]. This sets the remote’s ID to the default ID0. You can set the DVR’s ID by using the menu item “ID”. To set the remote ID to work with the DVR’s new ID, press [ADD] and then the appropriate number.
- I want to view my DVR using my web-browser (Internet Explorer) but it won’t let me install the ActiveX control.
-
The newer versions of Internet Explorer make it difficult to install ActiveX controls for security reasons. You can change your internet settings to allow them to install automatically, but this could open you up to malicious websites which we do not recommend.
- When you visit the login page for your DVR through IE, simply dismiss the warnings and do not attempt to install the DVR’s ActiveX control.
- Instead, download the installer from the link at the top left.
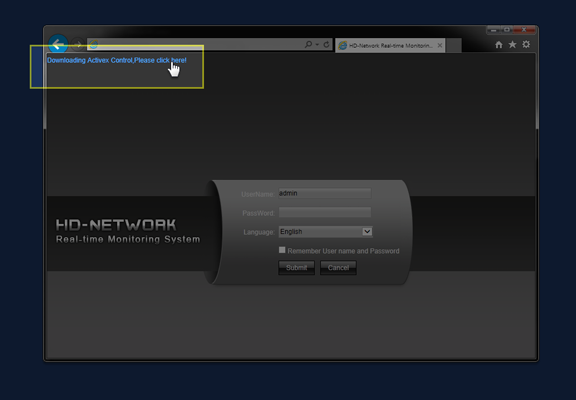
- Save it to your desktop and then completely close Internet Explorer.
- Run the installer from your desktop and follow the prompts to complete the setup.
- You can restart Internet Explorer and follow the prompts to allow the ActiveX control to run (if there are none, or if the link has now disappeared the installation was most likely successful).
- Login and the User Interface should now be visible.
Tip: You may have to do this with each model of DVR as the ActiveX controls may differ between models.
- The User Manual is not very clear on configuring Recording triggered by Motion Detection. How do I select/deselect the motion detection zones?
-
Enabling Recording on Motion Detection requires a few steps: 1) schedule motion detection recording times 2) configuring the detection zones and 3) linking actions.
- To schedule motion detected recording times, open the configuration menu using an attached mouse. Right click to bring up the menu, and select “Settings” from the list
- Select the [Channel] icon from the top bar
- Select [Schedule Record] from the left menu
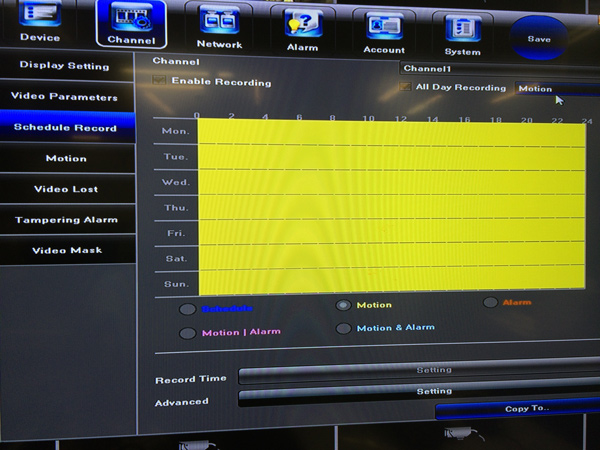
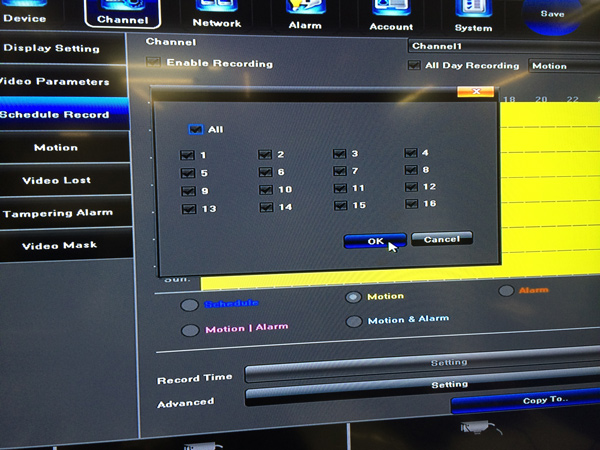
- You can schedule each channel individually, for example to enable privacy for a residence while providing security at night time. For the scope of these instructions, we will skip the method for custom scheduling. Select “Motion” from the box next to “All Day Recording” and ensure “Enable Recording” is checked.
- For the scope of these instructions, we will copy this schedule to all channels so Recording on Motion Detection is enabled for all channels. Click the “Copy To..” button and check “All”. Finish by clicking [OK]
- You will now configure the detection zones. Select [Motion] from the left menu
- Select your desired channel and tick the “Enable Motion Detection” check-box
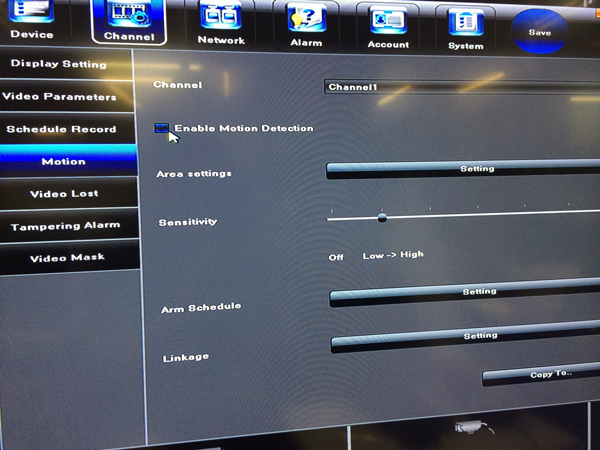
- Click the [Setting] button next to “Area settings”
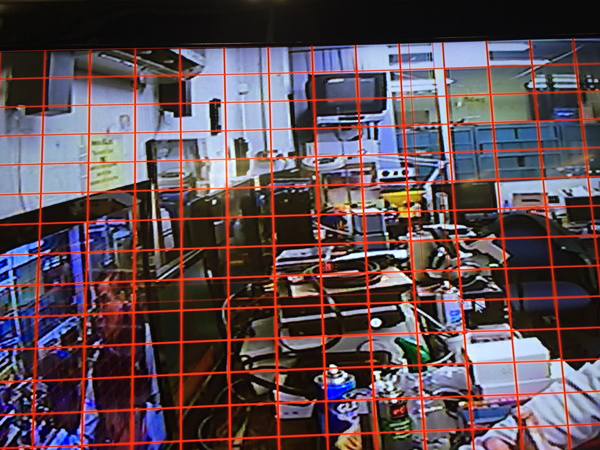
- The selected channel’s video will be shown with a grid. To select zones for motion detection, use the left mouse button to click and drag. The selected zones will be highlighted when you release. To deselect/remove zones, use the right mouse button to click and drag.
- To link the motion detection to actions, click the [Setting] button next to “Linkage”.
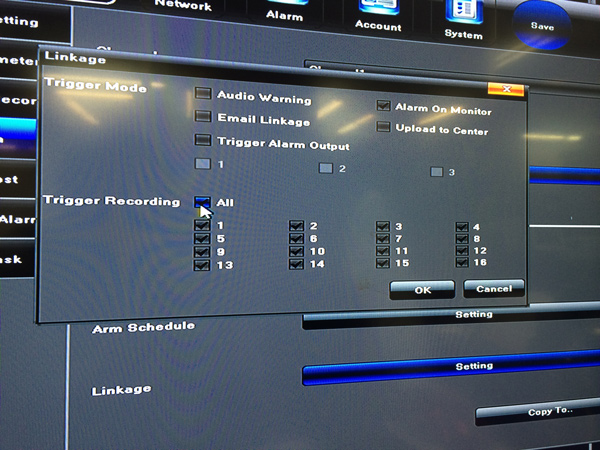
Checking “Alarm On Monitor” will show the motion detection icon on the screen when it is detected. Under “Trigger Recording” you should select which channels you would like to record when motion is detected. Hit [OK] when you’re done. - If you are happy with your configuration, you can copy your motion detection settings to other channels by clicking “Copy To..”. This works best if you have selected the full frame to trigger Motion Detection.
- Click the [Save] button from the top-right when you’re done.
- My video stutters or is very delayed when I view it via the Internet. What’s wrong?
-
Even though you may not experience speed issues with your internet connection where your DVR is installed, upload speeds can be heavily limited by ISPs unless you have a business internet account. This limits the amount of data you can upload, and when viewing multiple cameras, can result in streaming issues such as stuttering or large delays introduced by buffers attempting to compensate for inconsistent datarates. To get acceptable results, you will may have to experiment with the settings described below, but put simply you have to reduce the bitrate of the video being streamed (uploaded) from your DVR.
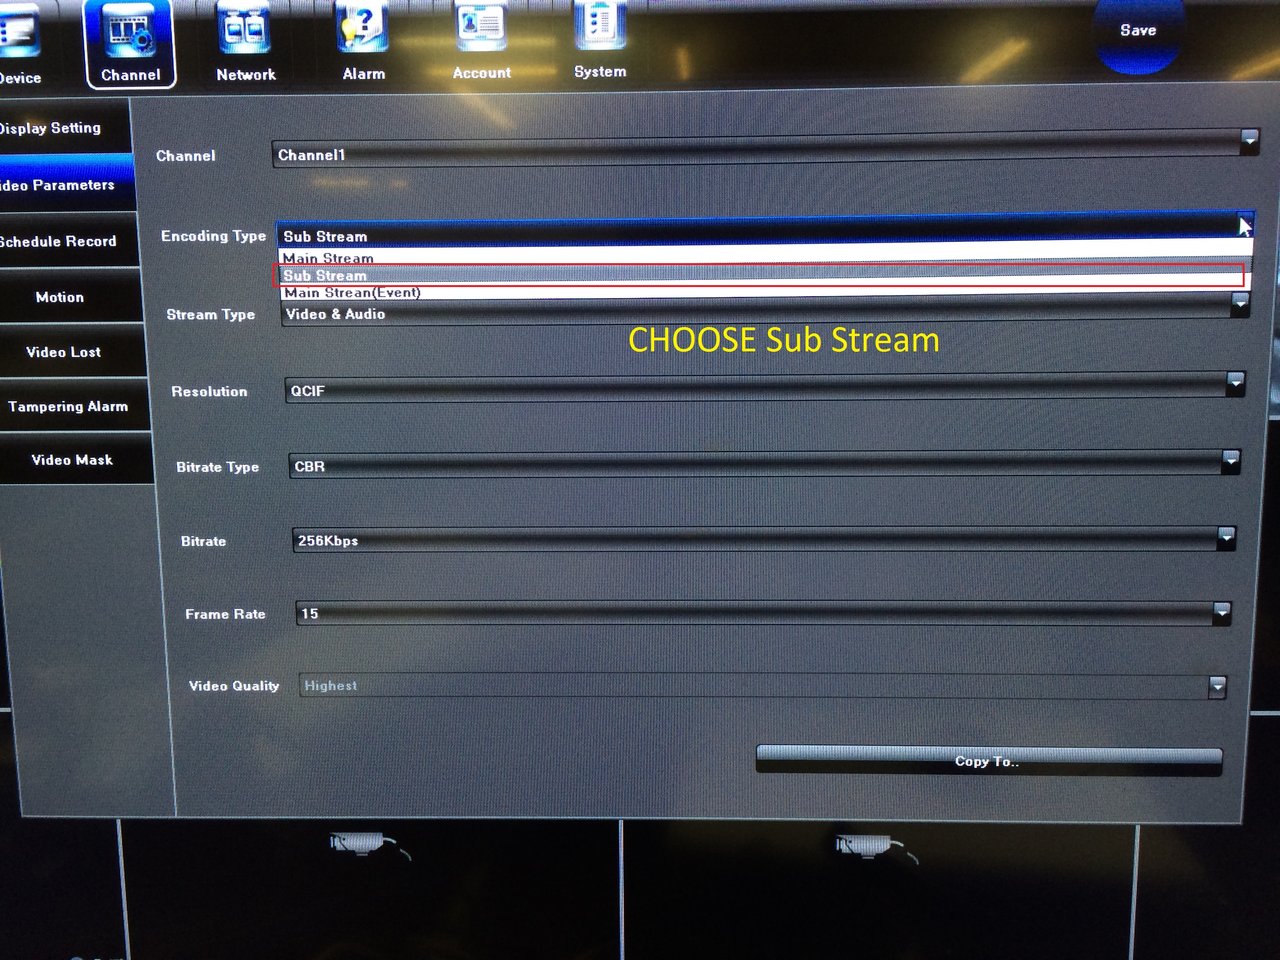
- Open settings and goto “Channel” > “Video Parameters”
- Choose “Sub Stream” from the “Encoding Type” drop-down.
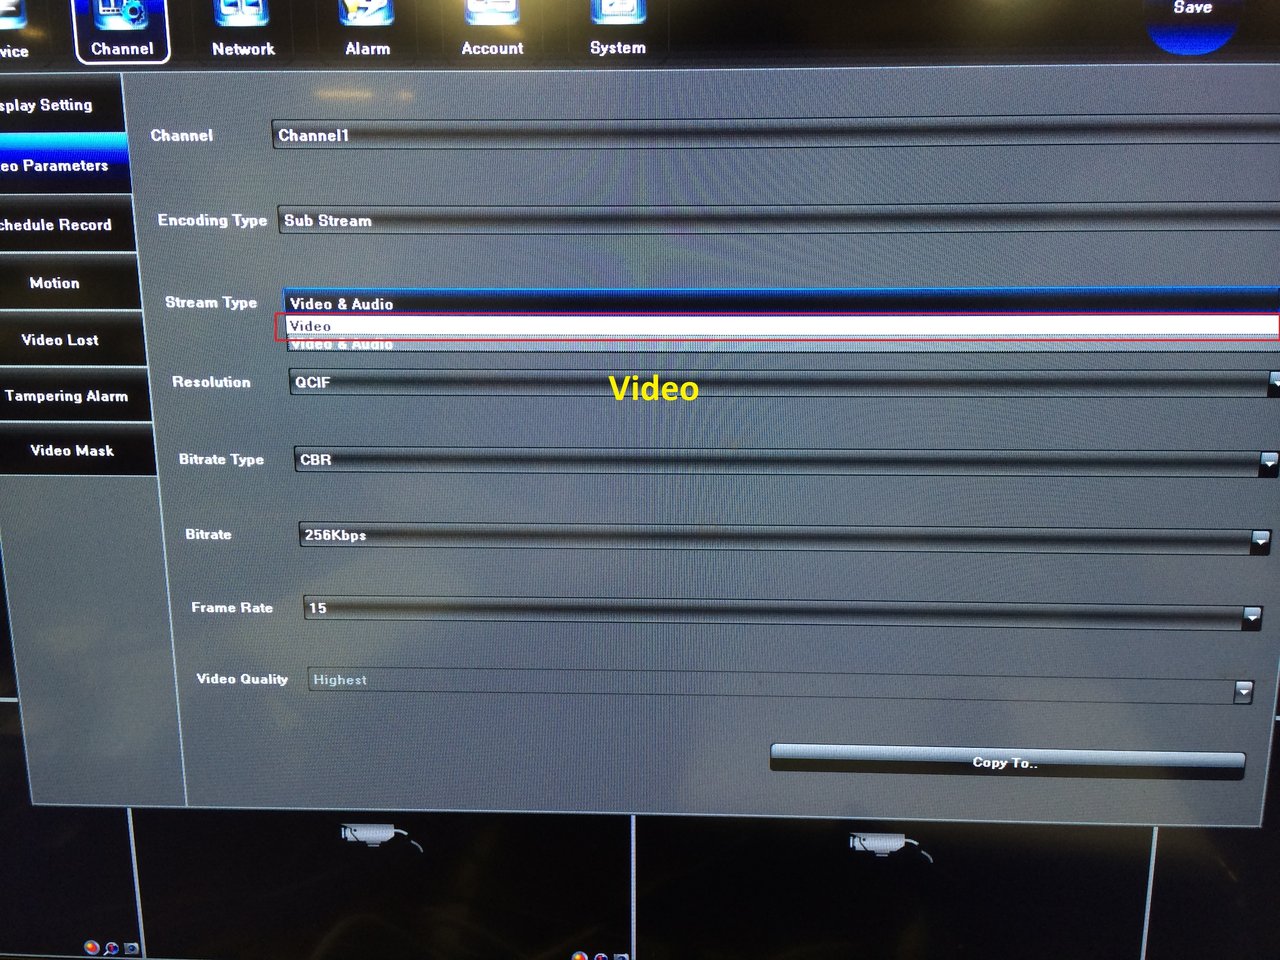
- Choosing “Video” from the “Stream Type” drop-down reduces the amount of data being sent by eliminating the audio stream.
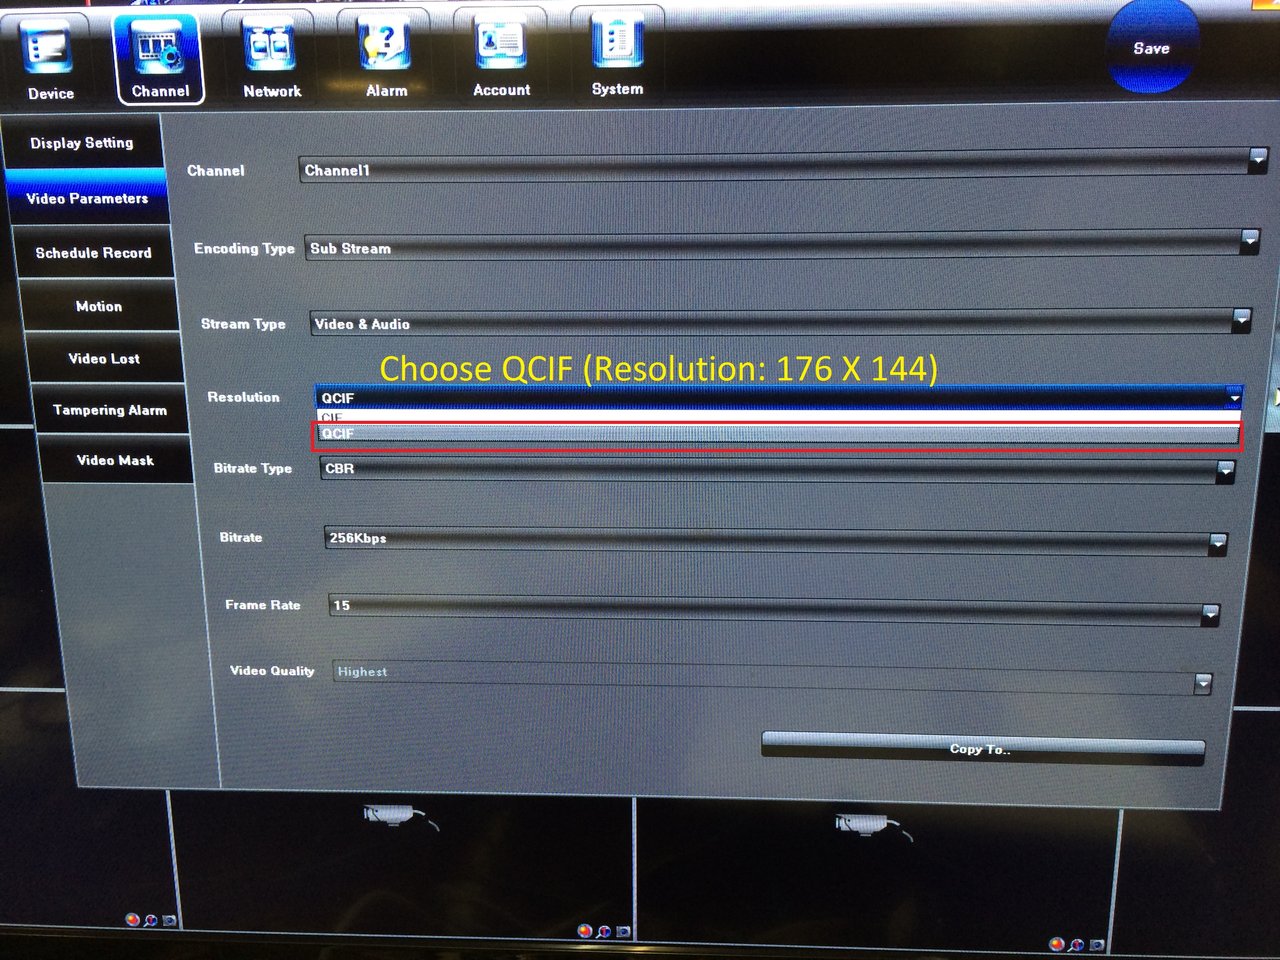
- Reduce the amount of video data by choosing “QCIF” from the “Resolution” drop-down—this is particularly useful if you are viewing your DVR from a device with a small screen.
- Choose “CBR” (or Constant Bit Rate) from the “Bitrate Type” drop-down.
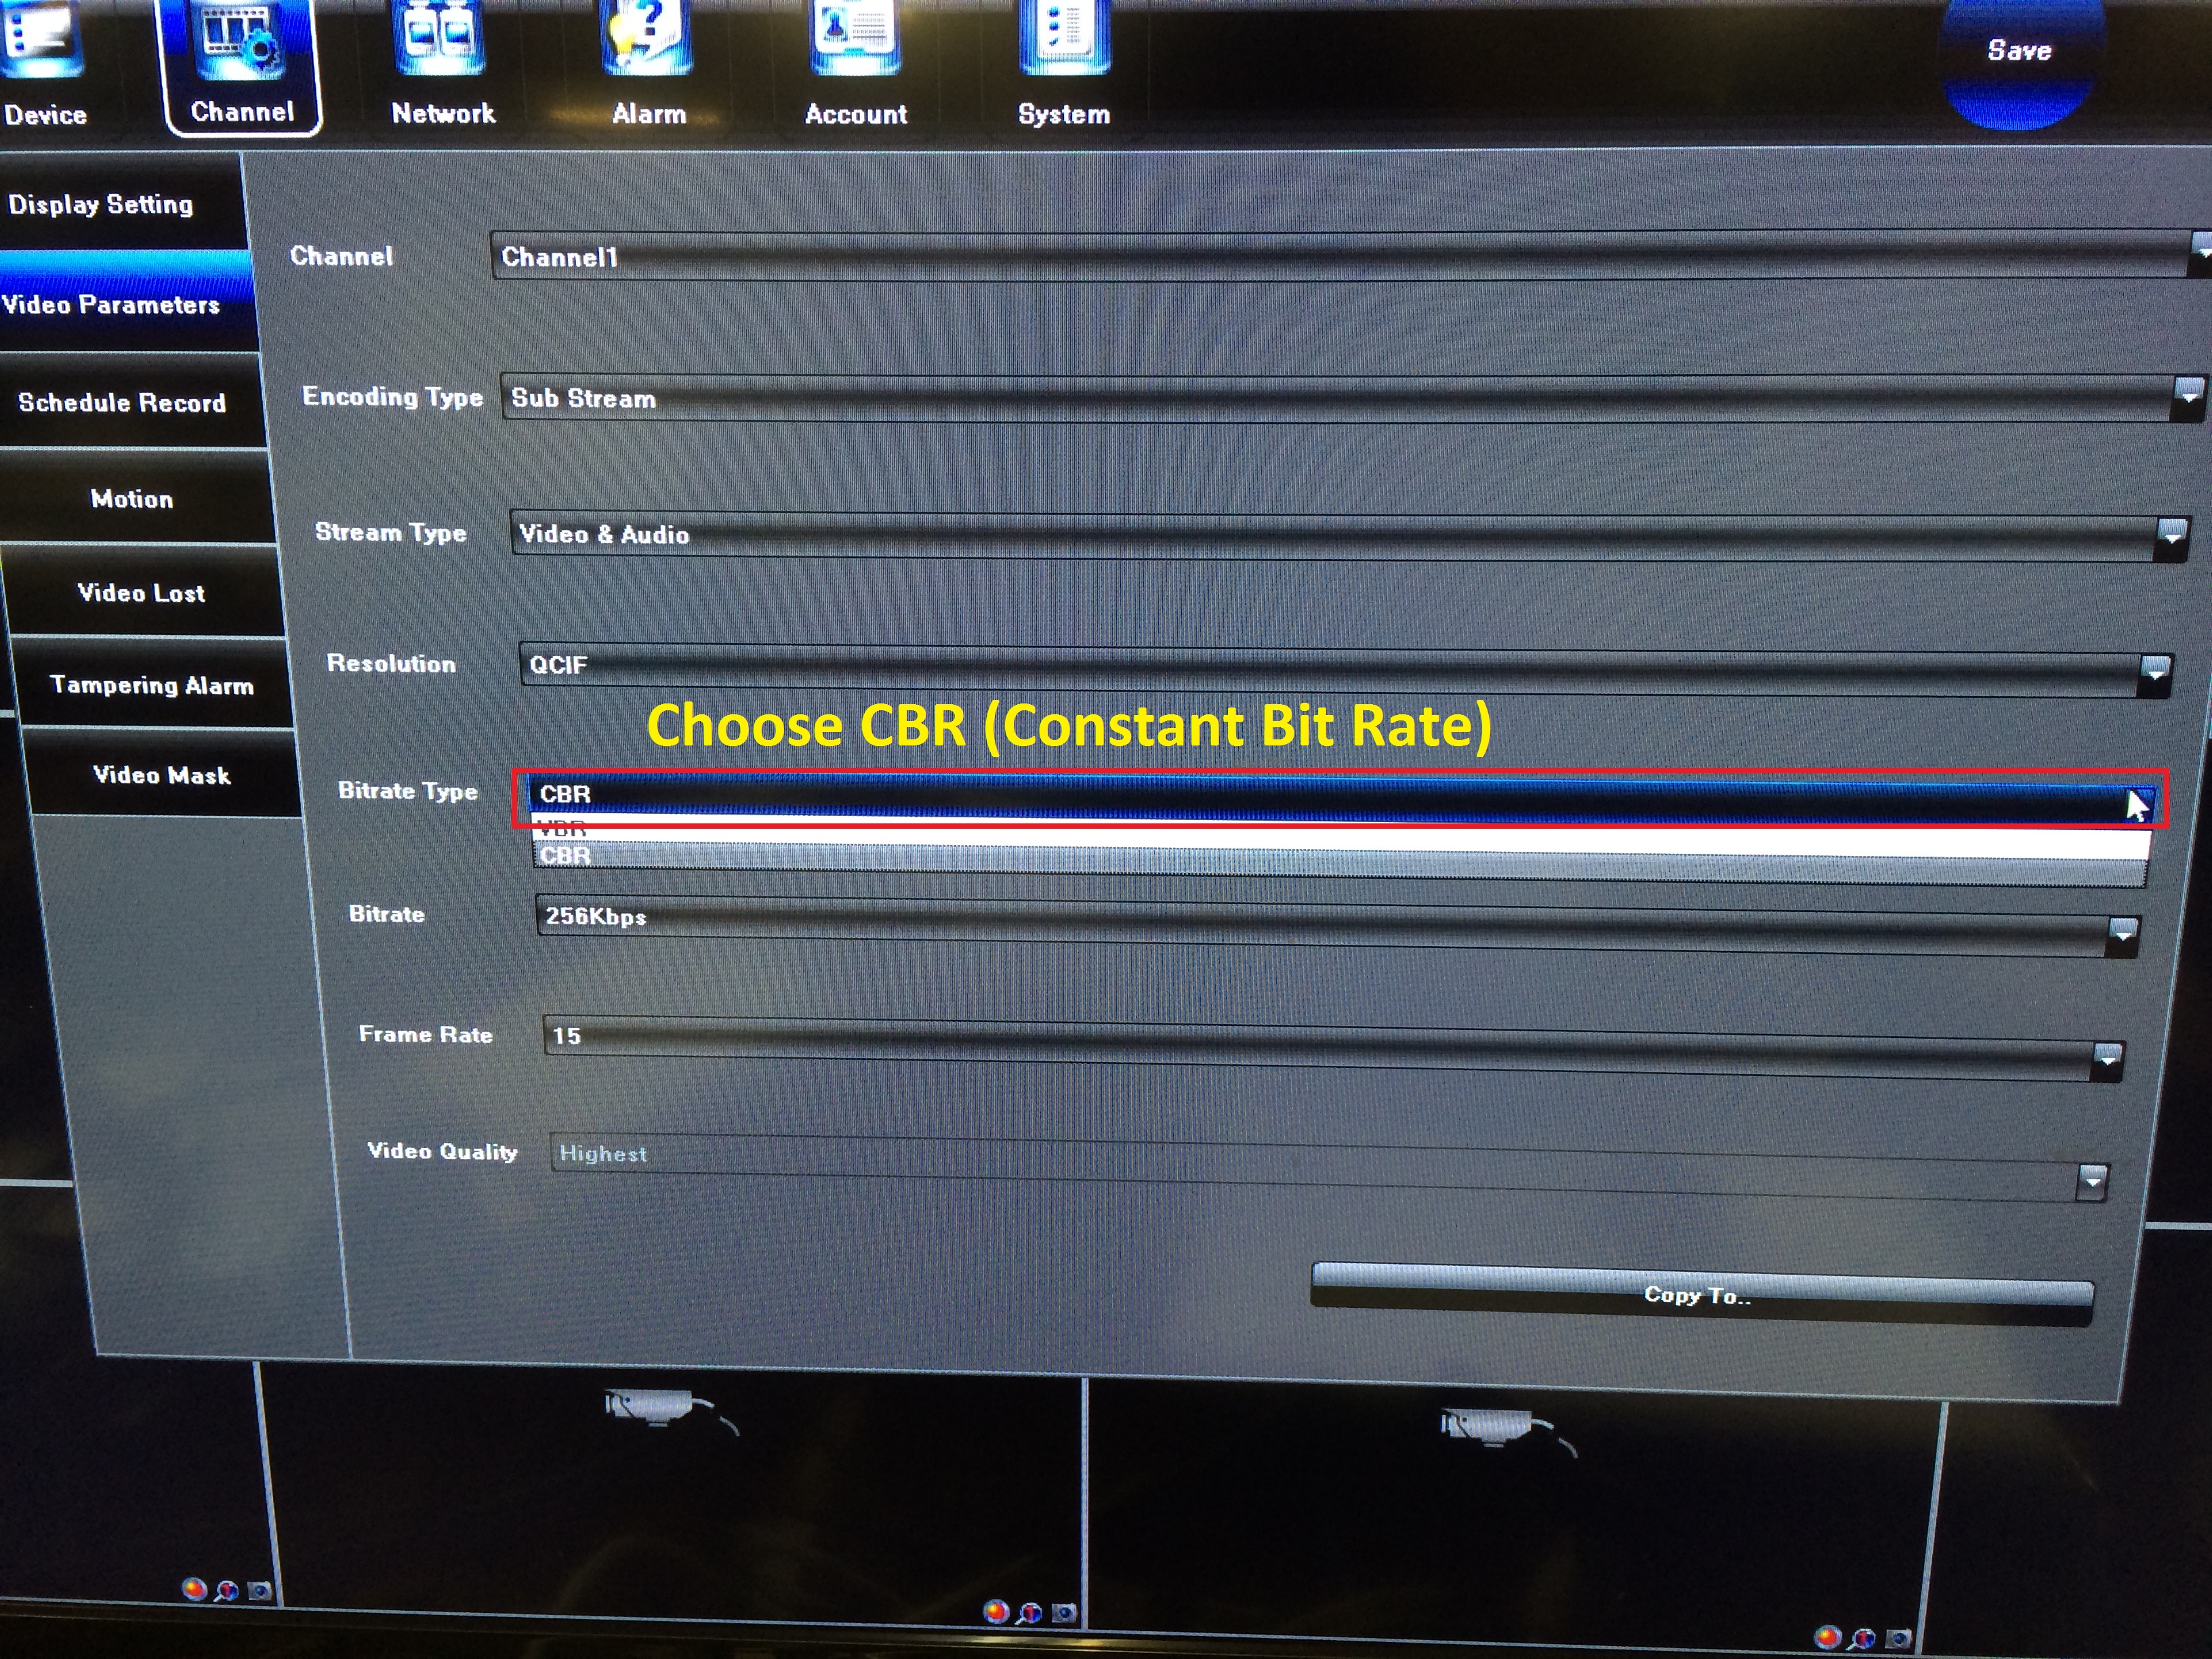
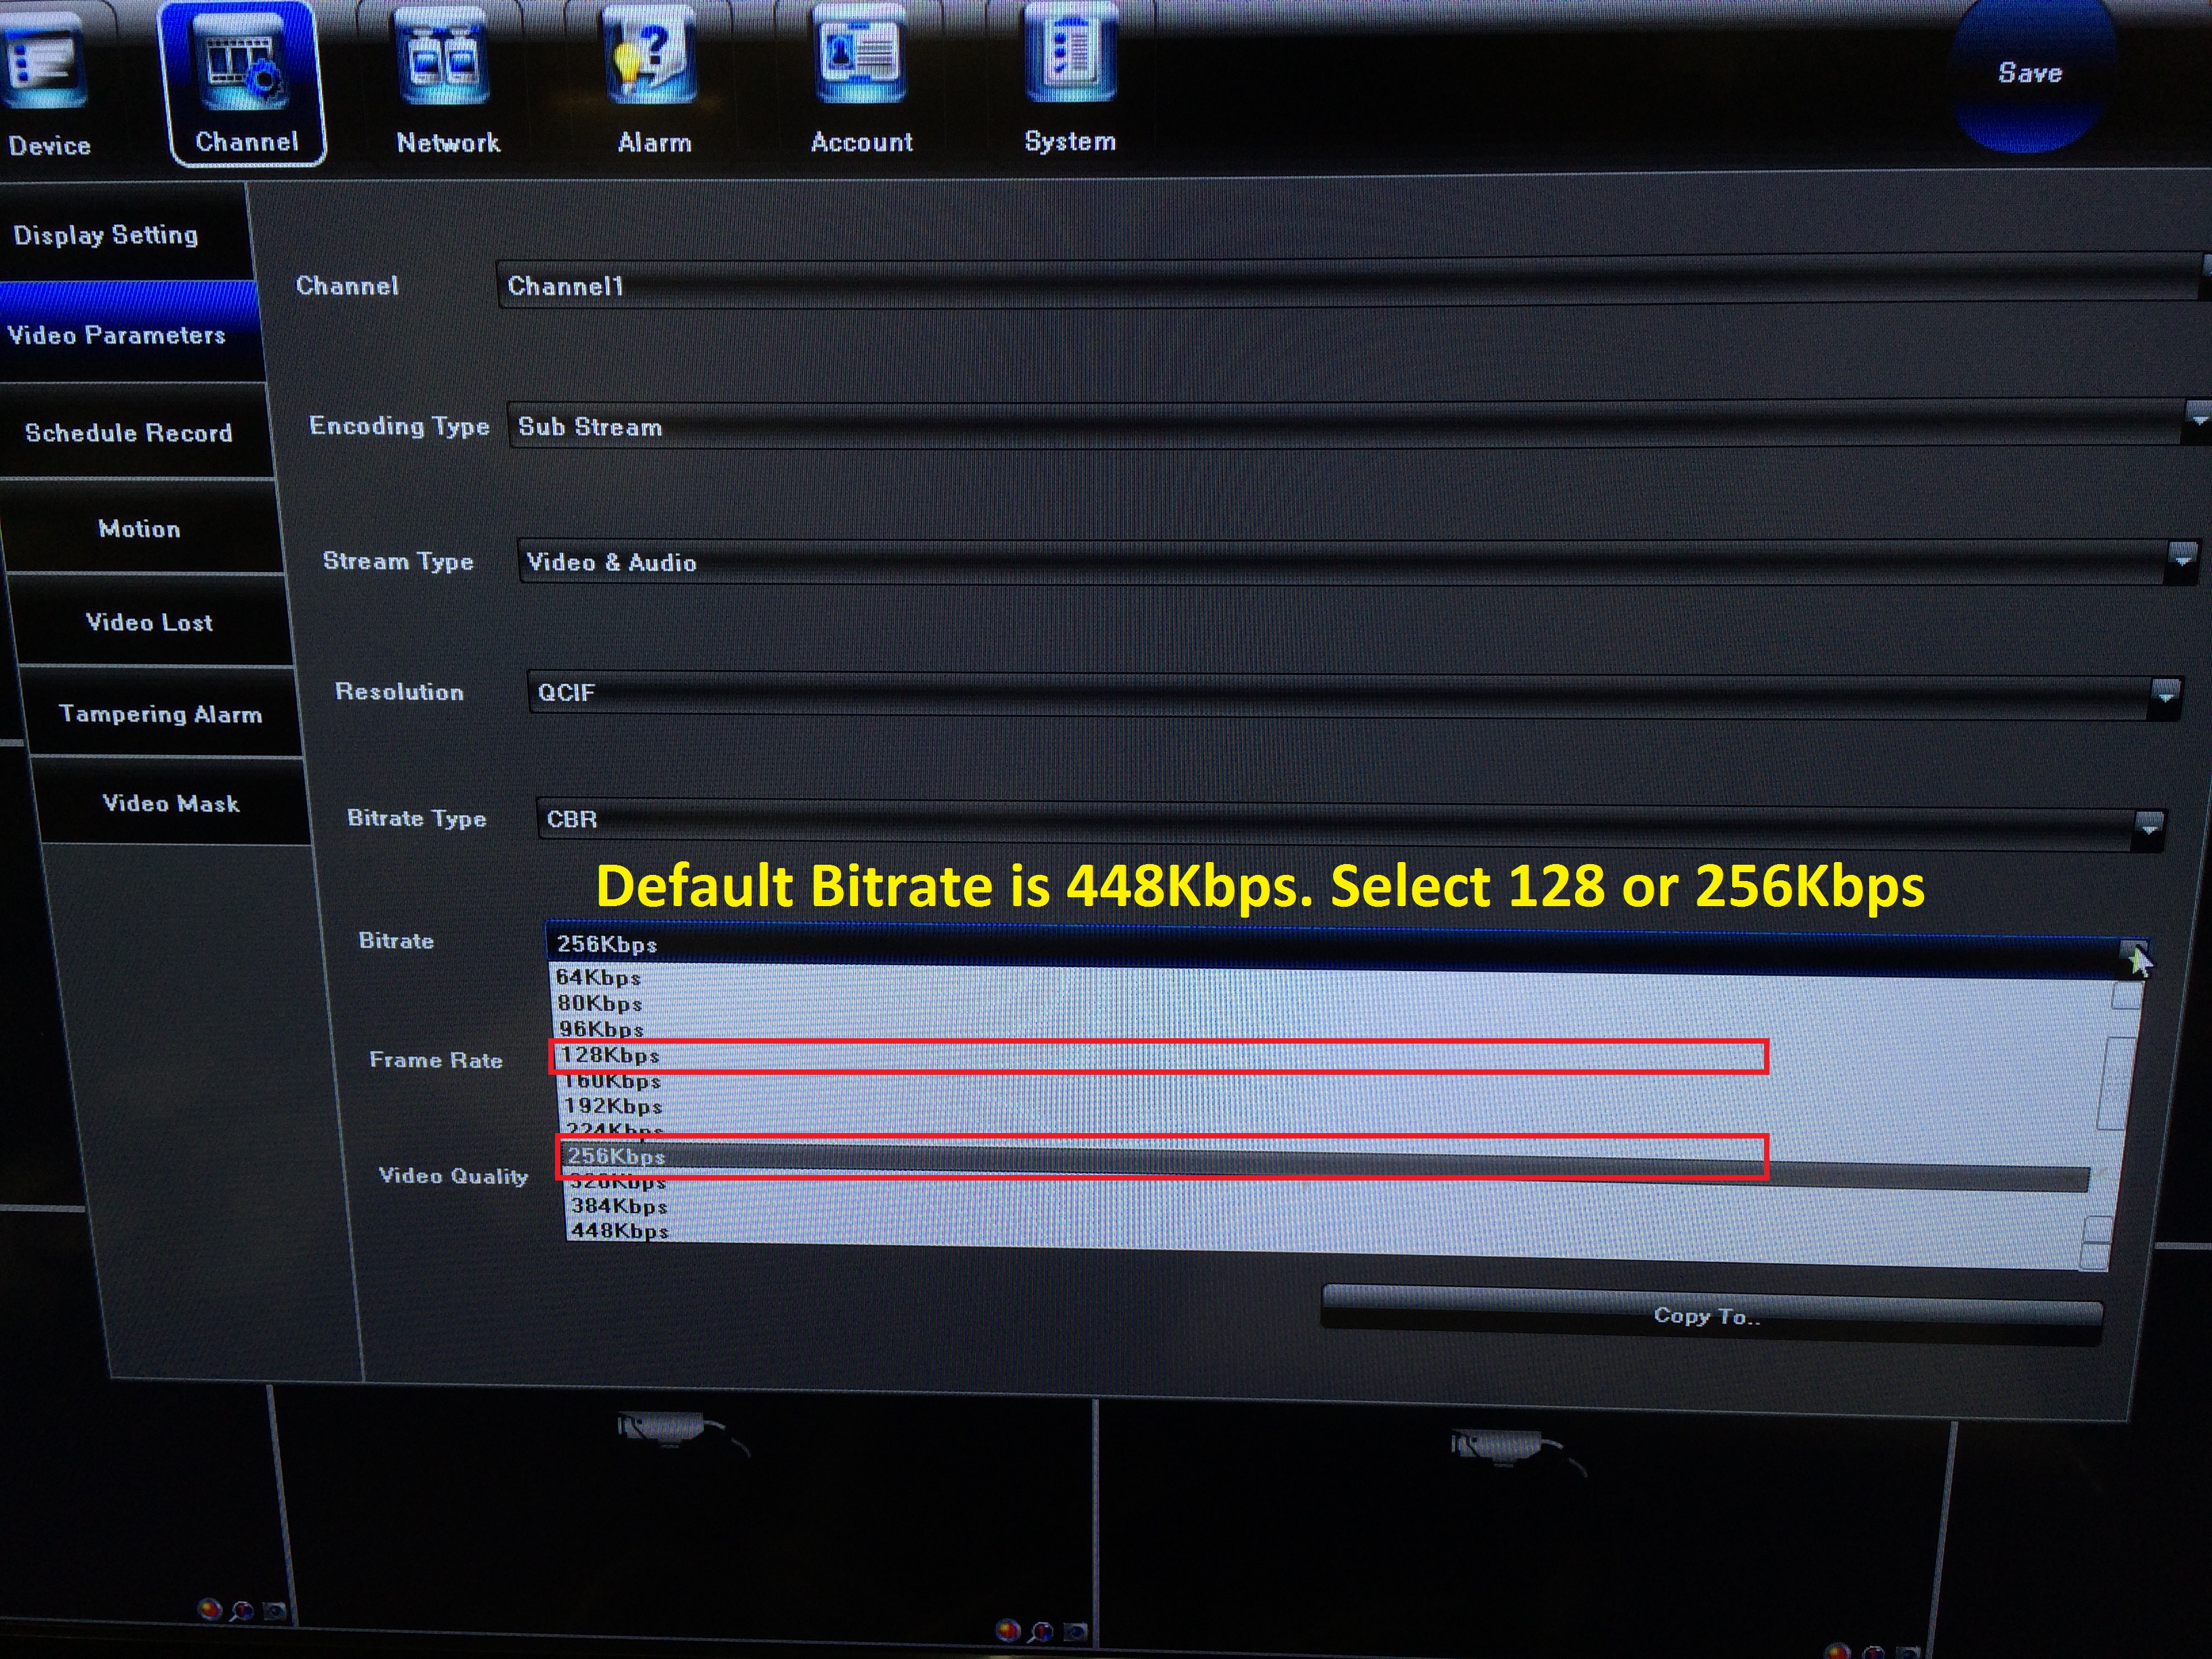
Sometimes variable bitrates can upset or confuse networking devices that can self-adjust for real-time data streams. For example when VBR is used and motion is low, the network only sees a small trickle of data, and leaves more bandwidth available for other devices or streams. As soon is there is motion, the bitrate spikes and the network hardware can be slow to expand the bandwidth available for streaming your camera, resulting in a stutter, or data loss. Not a problem for uploading photos to Facebook, but bad for hosting video streaming. - Reduce the bitrate limit to something low like 128kbps or 256kbps, and work your way up until you’re happy with the image quality.
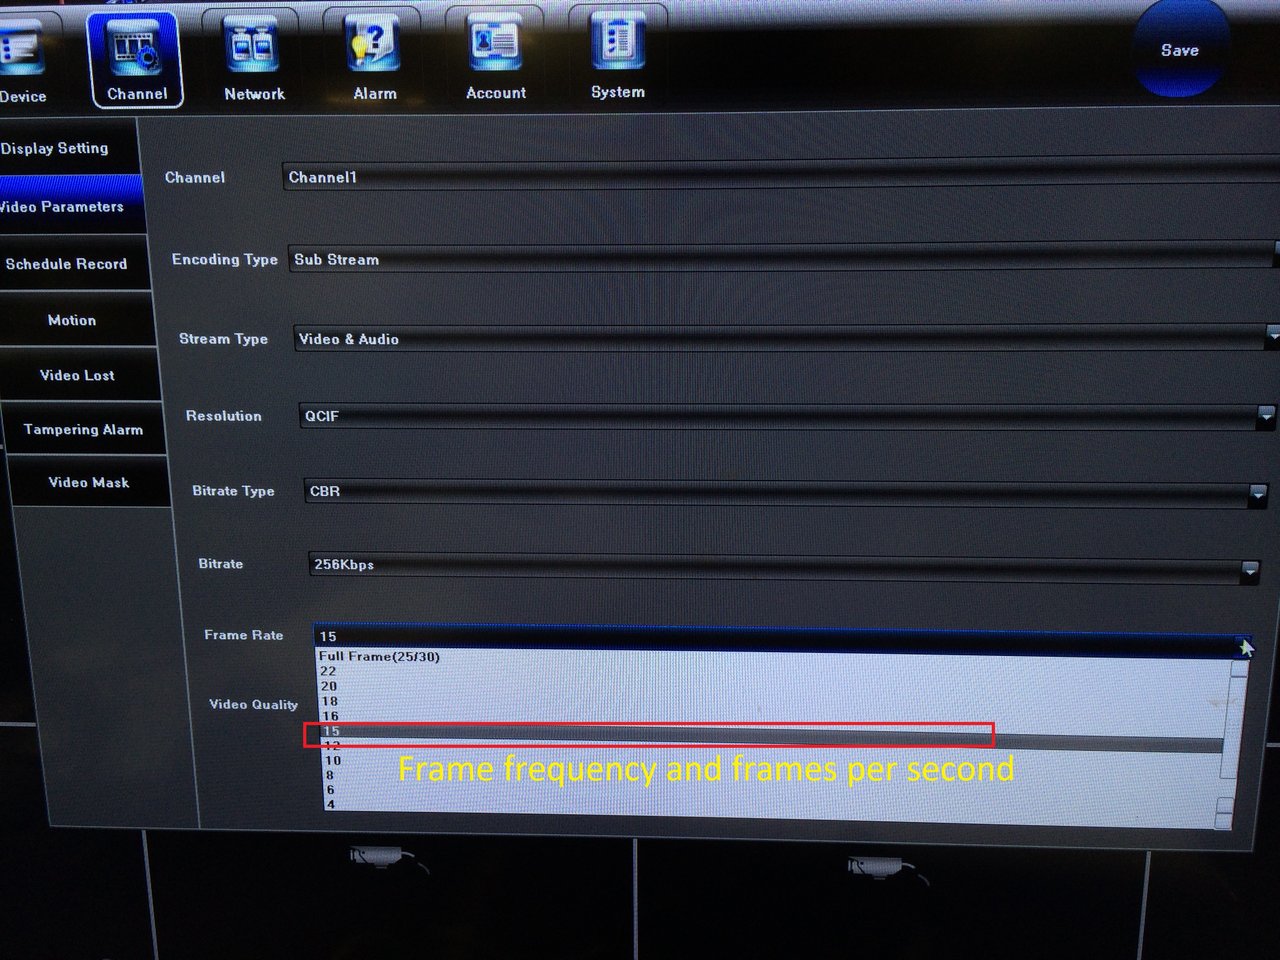
- Reducing the frame rate (or the number of frames per second) will help improve image quality for a specific bitrate but will reduce the smoothness of playback.
- Finally, hit “Copy To…” to save these settings for all (or specific) camera streams.
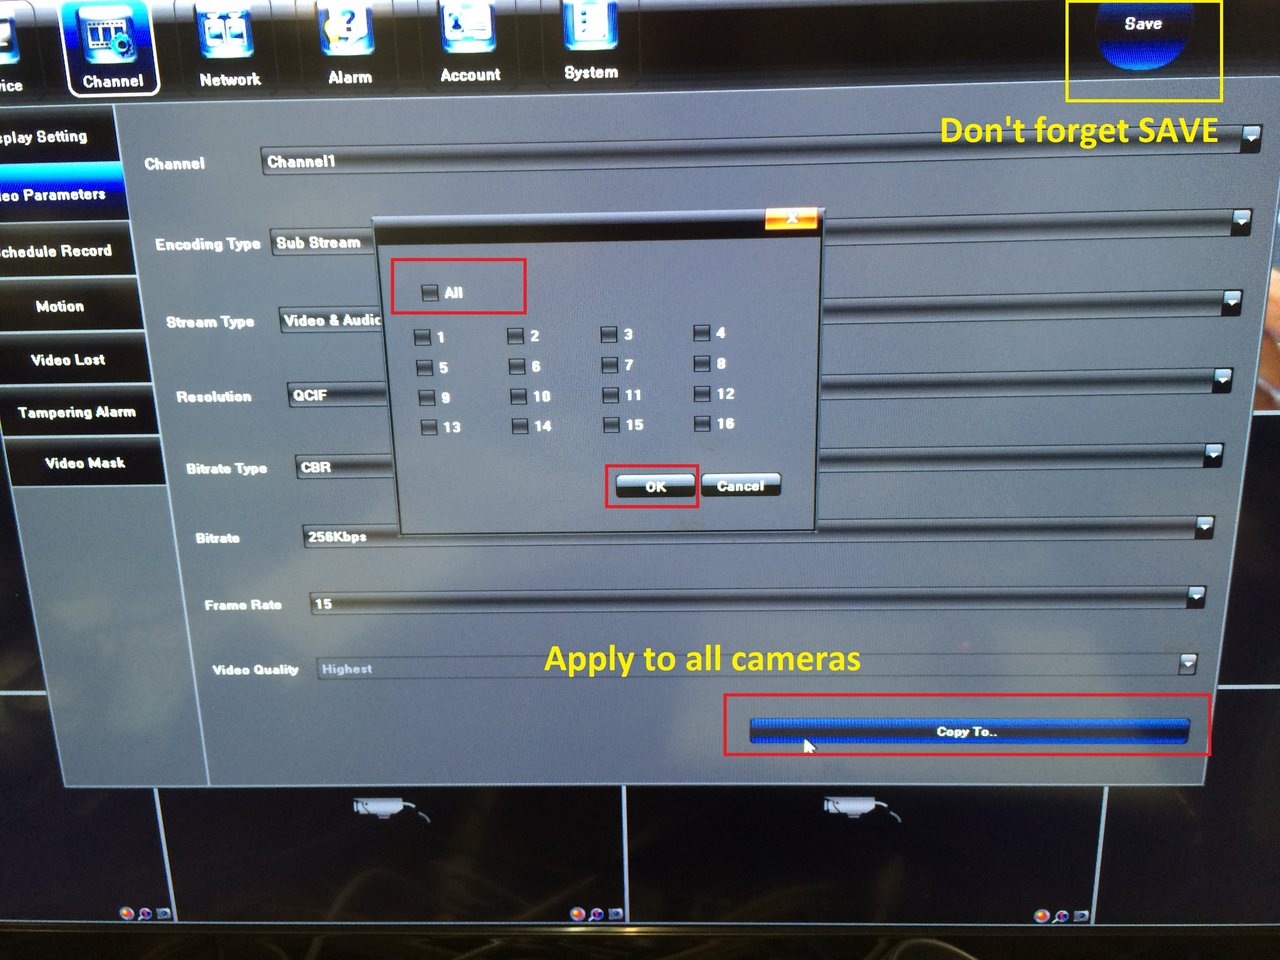
- Click “SAVE” to save the changes you just made.
Again, remember typical internet packages have a much slower upload speed than download speeds. Your available upload speed limits the amount of data you can stream from your DVR over the internet to your phone or other client device. Saturating your upload bandwidth, ie attempting to stream data at rates close to or above this limit will affect your download/browsing speeds also. When tweaking your DVR’s settings, try to keep a margin between the DVR’s streaming bitrate, and your maximum upload rate so that there is headroom for other uses and users of your connection.
You can determine your internet connection speeds using various online speed tests. A popular test is Speedtest.net by Ookla. It is best to perform these tests without any other internet usage taking place to establish an accurate baseline scenario.
- When I add my DVR to Goolink using the QR code (or manually), it says it is offline but my DVR is powered up fine.
-
There may be several reasons, but most likely your DVR does not have a connection to the internet.
Troubleshooting:
- Your DVR may not have a valid IP address. Ensure the DVR has DHCP enabled, or if it manually set, ensure the IP is in the correct range.
- Hint: The DVR’s IP address is displayed on the front panel
- If you have manually set the IP address, check it is not conflicting with another device on the same network.
- The DVR may not be physically connected to your router. Ensure all network cables are plugged into the correct ports; on your DVR, router and maybe even your patch panel.
- Your mobile device may not be on the same network as your DVR or does not have an internet connection of its own.
- Your DVR may not have a valid IP address. Ensure the DVR has DHCP enabled, or if it manually set, ensure the IP is in the correct range.
- I can’t connect to my DVR using a 3rd-party app such as MEYE. I have the correct IP and port but no connection!
-
Firstly, please check the DVR is indeed online and working correctly before checking the details below:
- Read the MEYE App instructions here: MEYE (or 3rd-party app) App Instructions
- If, for example, your DVR is set to port 8000, then you need to use 8003 (ie add 3 to port number) for MEYE or any other 3rd-party apps.
- By default the xDVR960 port is 5050
- So the default ports required are: 5050, 5051, 5052 and 5053
- You can set/find the port number in your DVR’s settings menu:
Network Parameters > Network Settings > Device Port
- Ensure these ports are forwarded through your router/modem etc and are accessible
- You can test this by using an online test such as: canyouseeme.org
What you need to know for new CCTV installations
Cameras
- What does each camera need to see? i.e. how far, how wide, how much detail?
- What are the conditions the camera needs to work in? i.e. Day or night, infra-red, indoor or outdoor?
- How will it be mounted, and are there any style considerations?
DVRs
- How many cameras does it need to monitor, allowing for any expansion?
- Do you need full D1 (576 line) recording on all channels?
- How many days of recording at what quality needs to be stored?
Cabling
- Do you want to run coaxial + power, or CAT5E/CAT6 with baluns?
Power
- Will you supply power locally to each camera, or have one central supply?
- What size of UPS do they need?
- Do you want a plug pack, wall box (needs an electrician to wire), rack-mounted supply, or power supply + video balun box in one?
Networking & Remote Access
- Does your customer want to view their cameras remotely?

